

Fuel system
Fuel TankFuel Tap
Carburettor
Choke
Air Filter
Fuel Tank
Fuel tank holds about 2.5 gallons (12L), with around 2 pints (1L) for reserve. Leakage from around the filler neck can be fixed by replacing the thick cork gasket around the cap. The clamping effect can also be increased by slightly bending the tangs on the cap - but this will usually have been done many times before you need to do it (by previous owners) - and a new gasket is the only answer. If the cork appears too thick - bend back the tangs on the cap.
Fuel Tap
Fuel tap has three positions:
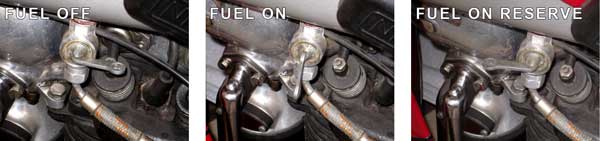
Fuel tap positions: OFF, ON, ON (RESERVE)
Carburettor
There are several variations of carbs - all Nimbus. For the sake of simplicity there are early ones - pre-1938, and late ones - post 1938. I will attempt to put more data here about these.
In addition to mixing the air and fuel for combustion, the carburettor also lubricates the inlet valve guides by sucking-in vapour from the crankcase via the vent tube.
The following diagram shows how the fuel get around the carburettor. Note the knurled mixture screw lurking to the RHS of the picture.
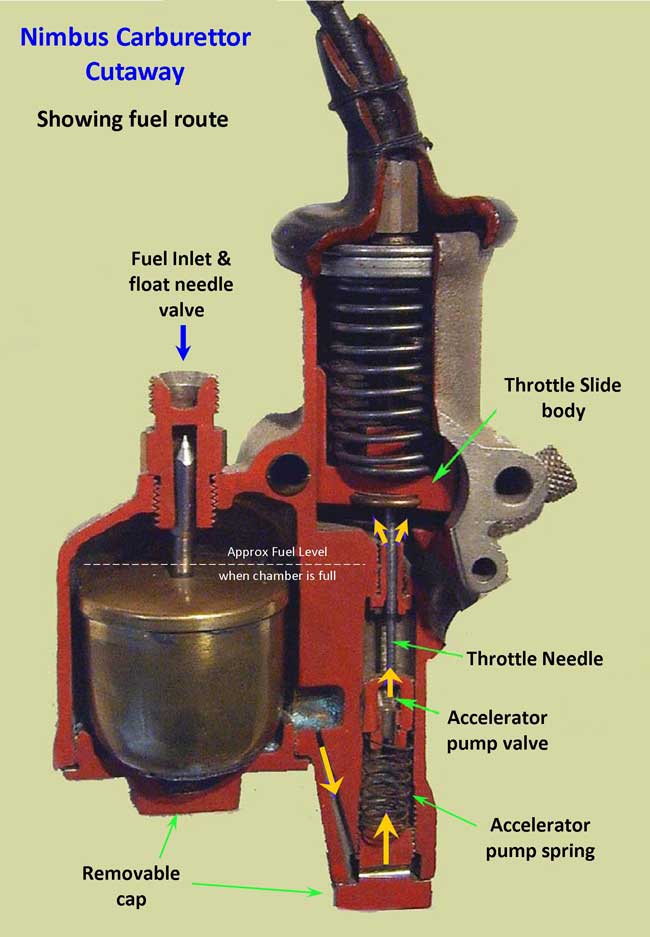
Carburettor cutaway
Choke
The choke has three positions (see pictures).
- Closed - for starting a cold engine. (The choke lever is forwards toward the front of the machine).
- Half-open - for warming-up the engine. (The lever is at about 45 degrees forward).
- Full open. For ordinary riding (the lever is at 90 degrees to the machine fore-aft).
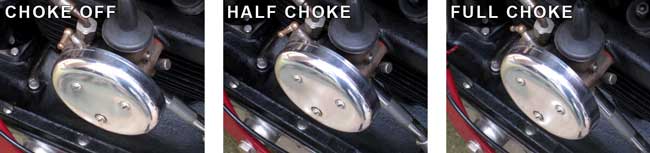
Choke positions: OFF, HALF, FULL
The engine usually starts easily, but in cold weather it's a good idea to fully twist the throttle two or three times. This will cause the accelerator pump to give some extra shots of petrol.
Beware - too much fuel pumped into the carburettor can cause flooding and starting problems. If this happens - turn OFF the fuel and OPEN the choke - then kick the engine over a few times (without operating the throttle at all).
Air Filter
The air filter is equipped with compressed wire mesh internals (a bit like a coarse 'Brillo' pad). Normally the mesh is coated with oil, and it easily captures dust and other particles. It should be cleaned every 2000 miles (more often in dusty areas). These days, most classic bikes are lucky to cover 1000 miles per year - so maybe clean the filter once per year? After removing it from the bike (three screws), wash it in paraffin or petrol (if you can afford the latter). Once rinsed, allow to drip-dry. Then dip in thin oil (make a mix using paraffin and engine oil), and allow to drip-dry again before re-fitting to the bike.

Accessing the air filter
Back to Technical ToC Top of page